OBS Studio is probably the most well-known streaming software for various live broadcasting needs on Windows, macOS and Linux.. Lots of content creators primarily use Open Broadcaster Software (OBS) regardless of their platform of choice, from Twitch to Facebook Gaming.
If you haven’t heard about the software until today, perhaps it’s time for you to get to know what you can do using OBS.
Why OBS?
OBS is one revered software simply because it is free-to-use, thanks to being open source— but do consider donating to the project if you enjoy using it.. You do not have to pay a monthly or yearly licensing fee to make use of what the broadcasting software has to offer.
A surge in community usage over the past few years also paved the way for OBS to be more user-friendly today than ever. So if you’re new to the whole streaming process, trust us when we say it won’t take long for you to be acquainted with how the software works!
By simply downloading the latest version of the app, you can begin sharing your broadcasts across different platforms. It is a popular and great software to use if you want the best quality broadcast.
This feature-rich software can handle anything you throw at it. Although it can be a little daunting figuring out how OBS works, here’s a quick guide to get your first stream up and running using it:
Link OBS to your streaming service
Before you can stream on your platform of choice, OBS needs the credentials to broadcast seamlessly on your channel.
The way to do this will vary according to the wide range of services OBS supports, but in general, you will need to generate a “stream key” in your account settings on your platform or simply connect your account to OBS.
There’s no need to worry about privacy concerns, though. OBS uses OAuth, so any user is not passing any of their personal login information directly to the software.
After generating a stream key, you will need to enter the credentials into OBS.
Step-by-step guide
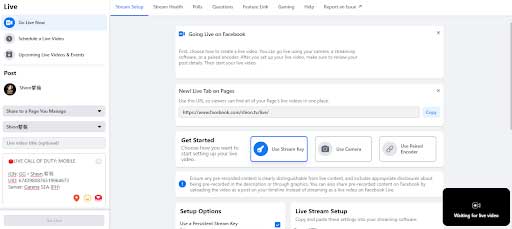
To elaborate the process in detail, follow the process below as a guide. For this example, the selected platform to stream on is Facebook Gaming:
- Go to Facebook Live Producer and make sure you’ve chosen the right account or page you want to broadcast on
- Copy the stream key and make sure you’ve checked “Use a persistent stream key,” so you won’t have to repeatedly copy-paste the credentials on OBS everytime you go live.
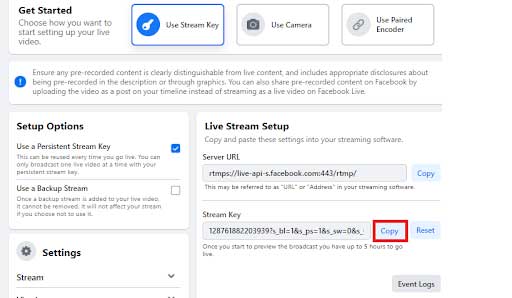
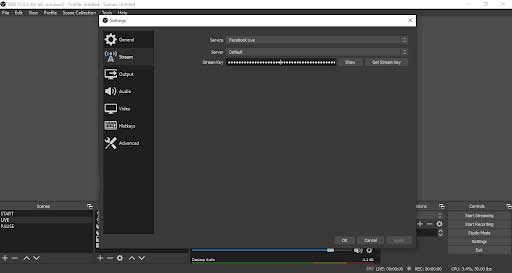
- On OBS, go to Settings > Stream > and select your specific platform. Paste the stream key and click Okay. Once you begin your broadcast (after clicking Start Streaming), a video preview of the stream shall reflect on the platform.
Twitch
Here’s a similar, brief guide of the process, but on Twitch— which is the leading live streaming platform today.
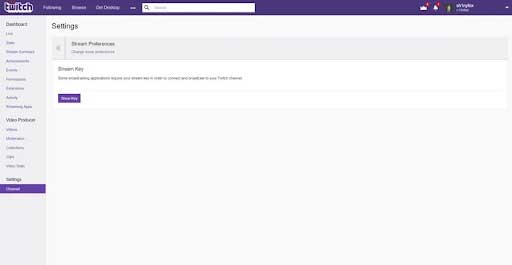
- On Twitch, click on your avatar in the top right > dashboard.
- In the menu on the left, click “channel” under the settings header > stream key button.
- Click show stream key and copy the text.
- Paste the credentials on OBS and select Twitch as the respective service.
YouTube
- Head to the Creator Studio page for your channel.
- Use the left-hand menu > Select “Other features” > and “Live Streaming”
- Now on the live streaming page, scroll down until you see a section headed “Encoder Setup.” Click the “Reveal” button and copy your stream key.
- Go back to OBS and paste it into the “Stream Key” section.
And just like that, OBS is now configured to stream on your channel!
Make sure to never give out your stream key to anyone else. Doing so would give them the ability to broadcast anything on your channel, even without your consent. You wouldn’t want inappropriate things to be broadcasted on your name, this might just result in a suspension or worse— channel deletion.
If you think your stream key privacy has been breached or compromised in any way, go into your account settings immediately and regenerate a new one.
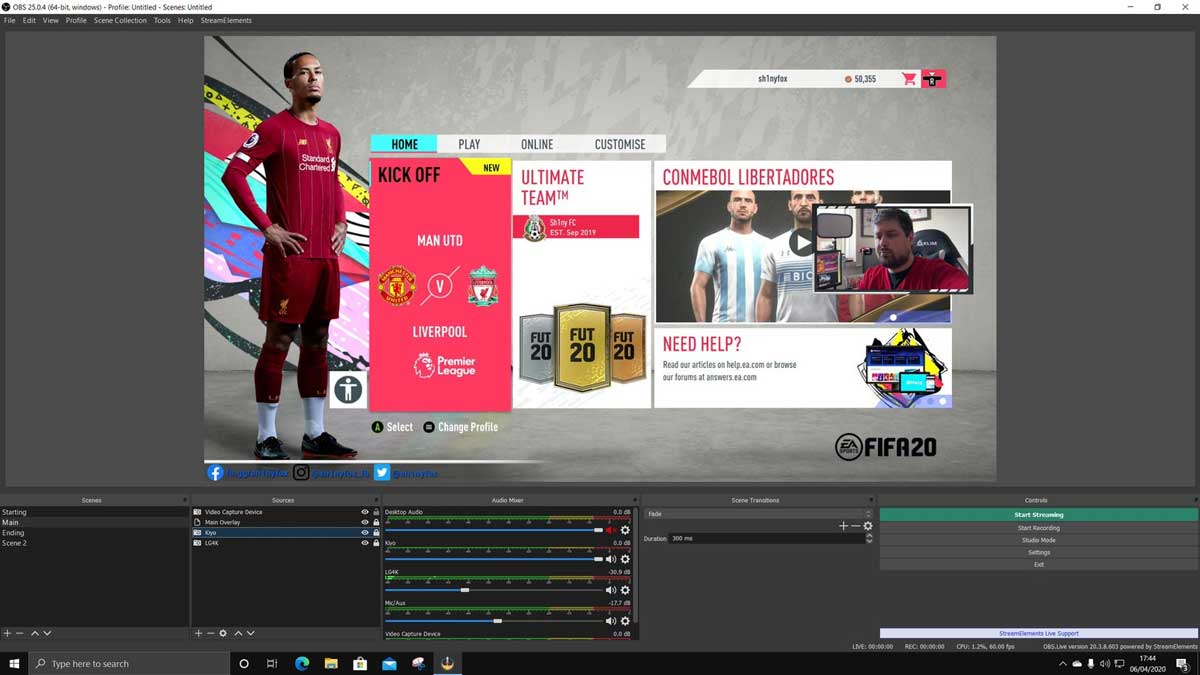
Setting up your gameplay video & audio
If you’re planning to stream your gameplay footage on your channel, you will need OBS to capture the game in action. Here’s how to do it:
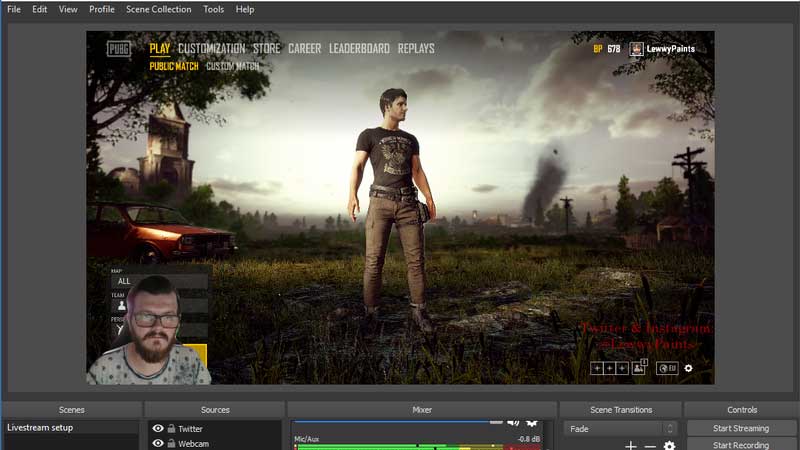
- In the “Sources” window at the bottom > click the “+” icon > select “Game Capture” from the list. It’s better to name the source with something related to the game’s title.
- Select the mode you desire— whether it’s capturing any fullscreen application, a particular window, or any application in the foreground (you can designate with a hotkey.)
Note: Whatever you pick will be up to your personal preferences and the game in itself. Fortunately, most games can be captured with ease, but there are games that cannot be captured as a specific window. Capturing any fullscreen app can work in that case.
- Decide carefully if you’re better off decreasing frame rates or changing output resolutions based on your desired stream quality and connection speed,
- Tick the respective boxes > Click OK. Now, the game is ready for capturing on OBS.
Adding a webcam video

If you want your stream to feature your face for those in-game reactions, personalize your stream by connecting your webcam to your PC. Here’s how you can set it up on OBS:
- In the “Sources” window > click the “+” icon > select “Video Capture Device.”
- Use the “Device” drop down and select your camera from the list
- Modify the configuration buttons and dropdowns to set your desired video quality and FPS.
- Click the OK button after you’re done
Audio capture
In a typical broadcast, you need to make sure your audience can hear you as well as the game you’re playing. Set up your stream’s audio by following this process:
- Click the “Settings” button found in the bottom right-hand corner.
- Select the “Audio” tab from the left-hand menu.
- Configure each audio input you are required to utilize for your stream, separately. This way, you can have your PC’s audio on the stream and your microphone as well — if you want your voice heard for any in-game commentary.
Tips and tricks
It’s completely normal to feel a little overwhelmed as you figure out how OBS works, especially if you do not have that much experience and history in streaming. But, always remember that everyone starts as a beginner at some point!
To help you get acquainted with the software faster, here are some tips you might want to check out:
-
Watch relevant YouTube videos
There’s basically a YouTube video for everything you would want to know, from how to operate an air-fryer to how to use a particular software. If you want to get to know how OBS works, a simple search on the video-sharing site would lead to hundreds of relevant content.
There are lots of content creators who are making detailed video guides (complete with commentary) about OBS, make sure to check them out!
-
Read detailed guides (articles)
A simple Google search for “OBS guide” would also yield hundreds of related articles you can use to know how the software works. There are also specific articles regarding different OBS features, which can help you navigate the software effectively for your desired broadcasts.
These articles often have detailed screenshots to help you follow the process, which makes it ideal to read for beginners.
-
Join the OBS community on Reddit
There’s a subreddit for OBS users, where members of the community can raise their concerns or ask others about certain features they are unsure of— from setting up cameras to microphone issues. You can also ask for detailed advice or suggestions on the Subreddit, and someone more familiar with the software is likely to answer and help you.
Most users raise their OBS concerns by providing their PC/laptop specifications, making it easier to diagnose the situation or figure out what’s wrong. So if you have any concern or question you want to raise, remember to be as detailed as possible.
-
Join the official OBS Discord
If you want to reach an official help resource (from the developers and most community supporters and moderators), you can use the official support channel on Discord for urgent or specific support. The live chat on the OBS Project Discord is recommended for those who are new to the software.
There’s also the official OBS project forum and help portal which you can check for your related concerns.
Things to remember
In order to set-up your broadcasts efficiently, make sure to select the resolution you’ll capture footage and stream at and the frame rate you want to broadcast at. Don’t worry, YouTube, Twitch, and Facebook have guides to help if you’re unsure.
Also, make sure that your internet’s upload speed can handle your streaming activities. Find out your upload rate using an internet speed test before you announce a stream or schedule one on your channel.
For beginners, the OBS configuration wizard may make the entire process a little bit more streamlined. Access it from the main OBS window, under the “Tools” tab.
It’s better to leave everything as default if you’re just starting out. Then, you can make adjustments along the way as you learn more about OBS and streaming.
You might want to lower the set resolution, bitrate, or Frame-Per-Second (FPS) if your broadcasts are rather laggy. If the video footage is poor and you have bandwidth to spare, try raising the resolution and bitrate to improve your stream’s quality.